IRLC to host Winter Hike Feb. 9

The Indian River Lakes Conservancy has scheduled its third annual "Celebrate Winter Family Outing" from 1-3 p.m. Sunday, Feb. 9, at the Grand Lake Reserve:

Comment

Nicole Caldwell

Nicole Caldwell is a self-taught environmentalist, green-living savant and sustainability educator with more than a decade of professional writing experience. She is also the co-founder of Better Farm and president of betterArts. Nicole’s work has been featured in Mother Earth News, Reader’s Digest, Time Out New York, and many other publications. Her first book, Better: The Everyday Art of Sustainable Living, is due out this July through New Society Publishers.

Better Bouldering

From left: Bradley Harrison Smith, Kara Colarusso, Jacob Firman, Sean Durning, Nicole Caldwell, and Rebekah Kosier install a bouldering wall on Better Farm's Art Barn.
We've got a brand-spanking-new bouldering wall at Better Farm, perched along an outside wall of the Art Barn.

Bouldering is a branch of rock climbing that involves climbing low rocks and boulders. It is often designed to be extremely challenging; so that while the climber may not go very high, he or she will have to be physically fit and very skilled. Bouldering is usually practiced with a large mat, so that if the climber falls, he or she will not be injured. It is also generally done in pairs, in case an emergency arises.

A bouldering wall is a type of rock-climbing wall designed specifically for the practice of bouldering. Like a conventional climbing wall, a bouldering wall is constructed with a sturdy wooden backing, and is designed to accommodate climbing holds of various shapes and sizes. Indoor and outdoor versions can be found around the world for practice, fitness, and recreation, and it is also possible to build your own bouldering wall. (Info from WiseGeek)
  
For our setup at Better Farm, we didn't build anything onto the existing wall; instead we simply used studs to anchor our hand and footholds. Most of what we did involved guesswork: stretching ourselves out to determine where the next piece should go, retracing our steps to pick alternative spots for additional pieces.

Check out Metolius Climbing for a great tutorial on constructing a bouldering gym at home.
Comment

Nicole Caldwell

Nicole Caldwell is a self-taught environmentalist, green-living savant and sustainability educator with more than a decade of professional writing experience. She is also the co-founder of Better Farm and president of betterArts. Nicole’s work has been featured in Mother Earth News, Reader’s Digest, Time Out New York, and many other publications. Her first book, Better: The Everyday Art of Sustainable Living, is due out this July through New Society Publishers.

DIY Cornhole Bag-Toss Board


People call it bag toss, cornhole toss, soft shoes, corn bags, bean bags, bean bag toss, bean bag game, hillbilly horseshoes, or just bags. What ever you want to call it, Cornhole is one of the fastest growing backyard games in America today. BetterArts is running the kids' room at this weekend's North Country Goes Green Irish Festival at the Dulles State Office Building in Watertown, so we set about making our very own custom cornhole board for all the excitement. Want one? Here are simple, step-by-step instructions so you can be the star of backyard parties this spring, summer, fall, or whenever.

DIY Cornhole Supply List:
  • 1 - 4' X 8' Piece of Plywood (pre sanded)
  • 4 - 2" X 4" X 8' Studs (2 by 4s make sure they are not warped or twisted)
  • 1 - Pack of Deck Screws ( 3-1/2" stainless steel square tip head)
  • 1 - Pack of Deck Screws (1-1/2" stainless steel square tip head)
  • 4 - 4" X 1/2" Bolts & Lock Nuts (stainless steel with washers)
  • Hammer
  • Jigsaw
  • Circular Saw
  • Drill (with square tip bit that should come with the screws)
  • 2 - Drill Bits (1/4" and 1/2")
  • Pencil
  • String
  • Measuring Tape
  • Fine Sand Paper (80-120 grit)
  • 1 - Bottle of wood glue (optional)
The Fine Print:
Corn Hole Plan Layout


Making The Plywood Cuts:  Start by making sure your plywood is square at the corners. You want to start at one end of the plywood and measure over 24 inches. You must measure each cut separate in order to avoid losing 1/16 of an inch due to the thickness of the circular saw blade. NOTE: Measure only one piece at a time starting with the first piece. Only measure for the next piece after you have cut the previous piece.
Cornhole Board Plywood Layout 
Make The 2" X 4" X 8' Cuts: Start with measuring from one end and make the first cut. Then measure the second cut and repeat the process. You should end up with 4 Pieces 4' long, 4 pieces 21" long, and 4 Pieces 11-1/2" long.
Cornhole Board Leg and Frame Layout

BetterArts Director Scott Smith makes the legs for the cornhole board.
Forming The Legs: Take the four 11-1/2" pieces and measure 1-3/4" from the end and center your mark. Place a deck screw in the center of your mark and tie a pencil to the string with the tip of the pencil at the end of the board. The string should measure approximately 1-3/4" long when tied. Now mark your round cut. Your going to remove both corners with a saw. You can round the edges with sand paper if you want them smooth. Pull out the deck screw and drill a 1/2" hole through each leg.
Cornhole Board Legs


Building the Frame and Deck: Note: You may want to drill out a 1/4" pilot hole before you put the frame together. This will help avoid the studs from splitting. Start with your 2" X 4" X 4' and place a 21" front and back underneath at a 90 degree angle flush with each of the ends. Insert two deck screws approximately 1-1/4" from the end and side as shown in the diagram below. Once you have completed the rectangles, place them a flat surface and mount the 2' X 4' plywood top on the frame. Make sure to start at one corner and make it flush, then insert a 1-1/2" deck screw. Then make the next corner flush with the edge of the 2' X 4' and insert a deck screw.  Once you have aligned the corners continue making the sides and bottoms flush at the edges insert the remaining deck screws.
Corn Hole Board Layout

Cutting the Hole in the Decks: Start at one end of the board and measure 9" from the end to the center of the board at 12". Place a deck screw in the center mark. Take your string and pencil and measure out 3". Keeping the string extended circle around the deck screw. If you have a ruler or paint stir stick you can drill two holes 3" apart. Place the deck screw in one hole and the pencil tip in the second hole and proceed to circle around the deck screw. Drill a hole inside the circle to allow your jigsaw blade to penetrate the deck. Carefully cut out the hole.
Cornhole Board Holes
Handywork of yours truly.

Mounting the Legs: Lay your deck upside down on a flat surface. Place the leg one leg in the corner as shown below. Measure 1" from the end of the leg to the inside end of the board. This will allow a small space for easy swivel. You can drill from the inside of the board through the hole in the leg. Run the drill about a 1/4" into the side stud and check for swivel range on the leg. Once satisfied continue drill through the side stud. Place the 4" bolt from the outside in and put a washer and nut on the inside. Tighten the nut until the leg becomes stiff to move.
Cornhole Board Legs
Image from Cornholesupplies.com.
Cornhole Boards Leg Mount

Finishing Touches: Once you get the legs mounted you can flip the boards upright with the legs in the open position and place them on a flat surface. Measure the back of the boards you will notice it is a bit higher than 12" (hopefully not lower or you'll have to remount the legs). Here is where you fine tune your legs to be as flat as possible to the ground while making the back of the board 12" even across. Take a sander or some sand paper and shave the bottom of the leg until you are satisfied with the height. You can also apply a coat of primer and paint the boards as you wish.


Primed.
Only one thing left to do... sew your cornhole bags. Here are some great instructions from Cornhole How-To:

SEWING YOUR OWN CORNHOLE BAGS
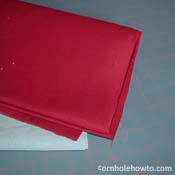
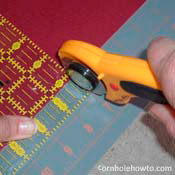
1 tn How to Sew To prevent mass confusion and a potential riot at your cornhole bags’ debut, you will want to have two different colors of fabric in order to keep teams’ progress straight. Themes like college or pro sports are typically popular choices here. Whatever your color scheme of choice, try to pick out sturdy-looking duck cloth that is as blemish-free as possible.

Since the fabric is pretty cheap, get a couple extra inches so you cansquare the cuts up at home for yourself.Give any loose ends a little trim in order to square things up.

4 tn How to Sew
Having been trimmed satisfactorily by either you or the fabric counter, your hunk of duck cloth will probably be a long strip 7” wide by 56” long. Now all you need to do is make the squares for each bag by cutting every 7 inches. Using the right tools can make things much more accurate and often more convenient. The rolling blade, a gridded cutting mat and a plastic cutting guide really make all this trimming simple, but if you don’t have any of these, a good ruler, a pencil, and some sharp scissors will do the trick.
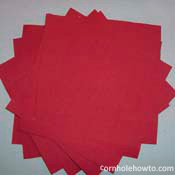
7 tn How to SewBy this point, there should be eight squares of duck cloth, 7 inches by 7 inches, just sitting there on your workspace, practically begging to be sewn up into four bags and stuffed with feed corn. Before plowing ahead, however, this is probably a good time to repeat the previous steps for second team’s color. In the end of this trimming phase, you should have sixteen total squares of duck cloth: eight of one color, eight of another.

Place two squares of the same color together so that their edges line up exactly; since the fabric is identical on both sides, it shouldn’t matter which side is up unless you want to decorate the outside with an iron-on logo. (If you do have an iron-on or something like that, it’s probably wise to put it on now according to manufacturer’s directions. Go ahead and put it on the inside since we will soon be turning the sewn bags inside-out.) Each seam should be 1/2 inch in from the edge, as shown in the picture. If have a fancy sewing machine like my mother-in-law’s, then you can actually set it to double-stitch all at once. Those with the no-frills model will need to sew a side completely, then repeat again on the same side right next to the first seam in order to get the double-stitch. Either way, the punishing abuse that cornhole bags take requires more than a single stitch. Got an itch to triple-stitch? Why not? Whatever your decision, be sure to back-stitch at all the corners to prevent the thread from unraveling.

Sew as indicated above for three of the four sides, but be sure to LEAVE ONE SIDE OPEN. You’ll need a hole for getting the corn into the bag. One smart move might also be to trim the corners a little. This will reduce the amount of excess fabric that gets crammed into the corners once you turn the bag inside-out.
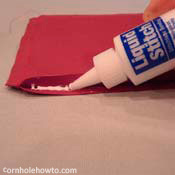
10 tn How to SewImagine your embarassment when, after bragging all afternoon to your buddies about your sewing skills, one of your new cornhole bags bursts a seam. We want to do everything in our power to prevent this awkward event. There are no guarentees, of course, but a little bit of fabric glue along the inside of those seams might help ease your mind on this subject. It probably can’t hurt in any case, but it’s an optional safety precaution that the risk-acceptant can skip.

Finally, turn the bag inside-out. Sharp corners are difficult to acheive given the stiffness of the fabric, but you can improve the look of the corners by pushing on the from the inside with a pencil, pen, etc. You’ll notice that once turned out, the bag is now the regulation 6 inches in width.
12 tn How to Sew 
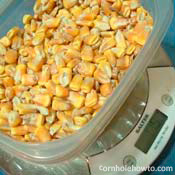
Measure out the corn you’ll need. Each bag should weigh between 14.5 to 16 oz. once filled. The material weighs about .5 oz per bag, so add 15.5 oz feed corn to each bag to make it one pound in total (spoiler alert: at Better Farm, we used dried soybeans instead of corn). As you play, the corn will break up, and your bags will actually lose a bit of weight in the form of dust, so you might want to make it on the heavy end of the acceptable range just to be safe. For this step, you can’t beat a digital baking scale, accurate to 1/8 oz., but if that’s not an option, 2 cups of corn comes pretty close to regulation. If you cannot abide that type of guess-work — good for you!–get the feed store to separate your order in eight individual bags of one pound each at the time of purchase. After all, for the 35 cents you paid for each of those pounds, you deserve some customer service.

Fold the open ends of the filled bag inward to a depth of 1/2 inch to match the rest of the seams you’ve already sewn. A well-placed sewing pin helped to hold the sides closed, and, in order to keep the folds from slipping once under the needle and for overall strength, apply some of the fabric glue to last, soon-to-be-sewn seam.
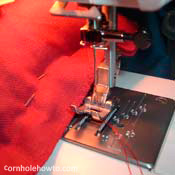
14 tn How to SewPinning the corn bag as shown in the picture helped keep the fabric flat and out of the way of the sewing foot—and will keep the corn from getting in your way. Placing your stitches as close to the edge as possible will give the bags a nice look. Do not forget to double-stitch here, too.

If you decide to buy bags, add a little spice by finding some with logos of your favorite sports team, customized with your initials, etc. You can even get a hold of some that glow in the dark. (Learn more about making your cornhole set night-time friendly in this e-book.)
1 Comment

Nicole Caldwell

Nicole Caldwell is a self-taught environmentalist, green-living savant and sustainability educator with more than a decade of professional writing experience. She is also the co-founder of Better Farm and president of betterArts. Nicole’s work has been featured in Mother Earth News, Reader’s Digest, Time Out New York, and many other publications. Her first book, Better: The Everyday Art of Sustainable Living, is due out this July through New Society Publishers.

Blazing a Trail

The Boys of Better Farm have been downright inspiring in their commitment to culling standing-dead trees on the property for firewood. While trudging through some back brush, they were struck by a long-idling idea: Why not carve out some trails in the woods for four-wheeling, snowmobiling, cross-country skiing, and good-old fashioned hiking?


They've been hard at work in the last few weeks laying out an initial series of trails. Here are a few shots of the network; more to come soon!


Care to volunteer on this or any other project? Get in touch with us at (315) 482-2536 or info@betterfarm.org.
1 Comment

Nicole Caldwell

Nicole Caldwell is a self-taught environmentalist, green-living savant and sustainability educator with more than a decade of professional writing experience. She is also the co-founder of Better Farm and president of betterArts. Nicole’s work has been featured in Mother Earth News, Reader’s Digest, Time Out New York, and many other publications. Her first book, Better: The Everyday Art of Sustainable Living, is due out this July through New Society Publishers.

'Falling Leaves' Hike Oct. 13


Comment

Nicole Caldwell

Nicole Caldwell is a self-taught environmentalist, green-living savant and sustainability educator with more than a decade of professional writing experience. She is also the co-founder of Better Farm and president of betterArts. Nicole’s work has been featured in Mother Earth News, Reader’s Digest, Time Out New York, and many other publications. Her first book, Better: The Everyday Art of Sustainable Living, is due out this July through New Society Publishers.

Iron Chef: Zucchini

Clockwise from top: Zucchini stuffed with lentil-walnut pate (vegan cheese topper); string beans in vegan cream of mushroom glaze, cucumber-zucchini-corn salad, boca slider, and zucchini-mushroom-olive-jalapeno pizza.
We've canned, frozen, pickled, sold, and eaten fresh hundreds of pounds of food this summer already; but to celebrate our recent abundant harvest of zucchini and other fresh veggies (aquaponic lettuce, anyone?!) we decided to host an "Iron Chef" cookoff Friday at Better Farm.

With zucchini as the secret ingredient, we tasked contestants with coming up with dishes featuring the flavorful vegetable. Here's what they brought to the table:

The Menu
  • Zucchini-Cucumber Salad with Lemon Juice and Corn (Holly Boname)
  • Zucchini Stuffed with Lentil-Walnut Pate (Nicole Caldwell)
  • Sliders featuring Locally Sourced Beef (or Boca burger), Aquaponic Lettuce, Tomatoes, Cucumber, and Zucchini Slices (Nicole Caldwell)
  • Homegrown String Beans in Vegan Cream of Mushroom Glaze (Matt Smith)
  • Zucchini, Jalapeno, Mushroom, and Olive Pizza (Nick Bellman)
Every ingredient came directly out of Better Farm's gardens (exceptions: lemon juice, lentils, walnuts, mushrooms, soy milk, homemade pizza dough, cheese and olives). Here's the spread:


It was too tricky to pick a winner, so we just ate until we couldn't take another bite. Stay tuned for the next round!

For any of the above-listed recipes, e-mail us at info@betterfarm.org.
Comment

Nicole Caldwell

Nicole Caldwell is a self-taught environmentalist, green-living savant and sustainability educator with more than a decade of professional writing experience. She is also the co-founder of Better Farm and president of betterArts. Nicole’s work has been featured in Mother Earth News, Reader’s Digest, Time Out New York, and many other publications. Her first book, Better: The Everyday Art of Sustainable Living, is due out this July through New Society Publishers.

Spotlight On: Woodhenge Self-Reliance Campus

On Part II of last week's Better Farm field trip, we paid a visit to the Woodhenge Self-Reliance Campus in Adams Center, N.Y.

A so-called "Center for the Study of Things Practical and Not So Practical," Woodhenge is an off-grid, renewable energy, alternative building and sustainable agriculture learning center in Northern NY. Owners Krista and Jim Juczak energy classes in solar, wind and microhydro, as well as sustainable agriculture, building methods, and biofuels.

From his blog, Jim writes: "My wife and I are the founders of this little experiment in sustainable living. We purchased the land about 13 years ago and decided to try to live the ideals that we've shared for so long. I'm a 'shop' teacher with 24 years in public education and my wife, Krista, is a foreign language teacher (mostly German) with 22 years in the business. We've both done a lot of other jobs in a wide variety of locations. 


"We don't believe in mortgages, everything on the 52-acre site is paid for. This includes our 18-sided, 3,000-square-foot cordwood and papercrete home, a recycled home, a 1000 sq.ft. workshop, an underground home, several cabins, outhouses and shower houses. We are NOT connected to the grid. All of the power that is needed is made through a collection of solar panels, wind turbines, firewood, etc.

"We saw and see the need for a place that people can come to learn the basics of living simply. Simply here does NOT mean poorer. We feel that people have been trapped in our society by not having the knowledge available to them that was available in times past. Building homes designed for the area/climate you live, growing and preserving food that is actually good for you, making the energy systems that you need to be comfortable are just some of the things we do here. An undercurrent of reconnecting with people around you is a secondary feature of living the way we do.

"I believe that within a very short amount of time a series of crises will cause most of humanity to live at a considerably lower standard of living. Woodhenge is a place for people to come before this happens, to learn the coping skills that have been lost due to the way most of us live our lives. It takes time to simplify; to learn to garden, to learn to build, to learn to sustain!"

Couldn't say it better myself! Here's a photo tour of all things Woodhenge:

Main House
Canned food to last through winter, cordwood walls, hanging art.


Ceiling featuring tongue-and-groove and reclaimed wood from a bowling alley. Wagon wheel chandelier with mason jar lights.


The Grounds and Outbuildings


Fuel tank that will eventually be an underground house.

Former motel-turned-apartment, foreground, and main house with living roof in background.

Woodhenge is located at 13910 Fuller Road, Adams Center, NY 13606. To learn more, visit http://woodhengeself-reliancecampus.blogspot.com.
1 Comment

Nicole Caldwell

Nicole Caldwell is a self-taught environmentalist, green-living savant and sustainability educator with more than a decade of professional writing experience. She is also the co-founder of Better Farm and president of betterArts. Nicole’s work has been featured in Mother Earth News, Reader’s Digest, Time Out New York, and many other publications. Her first book, Better: The Everyday Art of Sustainable Living, is due out this July through New Society Publishers.

Spotlight On: Kripalu Yoga and Wellness Center

The main meeting space at Kripalu; site of healings, reiki, workshops, and of course yoga classes.
Several people from Better Farm (two betterArts residents, a sustainability intern, and I) yesterday took a field trip to Adams Center, N.Y., to visit two very special places: the Kripalu Yoga and Wellness Center, and Woodhenge Self-Reliance Campus (blog post on the latter to follow!).

Our first stop was at the Kripalu Yoga and Wellness Center, which was founded more than 30 years ago on the belief that all humanity is one family and that the Divine swells within each of us.  The center is a non-profit organization dedicated to promoting the integration of body, mind and spirit. Its members support this philosophy through the teaching and practice of yoga, health related programs, and services to nurture personal growth and community.


The sprawling property includes a main meeting house for workshops, yoga classes, healings, reiki, and more; a nature trail, stone circle, artwork, and sculpture, and labyrinth.

The center offers the following:

The centerpiece of the center (and highlight for us) is a 70-foot labyrinth installed more than a decade ago by board members and people in the community who volunteered their time and materials for the effort. The center's president, Nancy Pfeil, took time out of her day to show us around and join us on a stroll through the labyrinth and short hike on the property.

The Labyrinth
Nancy explained to us the history of labyrinths; that they're found in many cultures dating back as much as 3,500 years, and that unlike mazes, labyrinths are  unicursal, having a single path leading to the center with no loops, cul-de-sacs or forks. They all share the basic features of an entrance or mouth, a single circuitous path and a center or goal.

Here's Nancy showing us a finger labyrinth she made ages ago while traveling through the southwest with her husband (she made it out of yarn and nail polish atop a red rock!):

Many community organizations, churches and retreat centers are making labyrinth walks available for public use for prayer, meditation, contemplation or personal growth. The labyrinth walk is popular with a growing number of people  because of it simplicity and the ability to approach its paths on your own terms.

To walk a labyrinth (or run your finger over one) is a right-brain task. It involves intuition, creativity, and imagery. With a maze many choices must be made and an active mind is needed to solve the problem of finding the center. With a labyrinth there is only one choice to be made. The choice is to enter or not. A more passive, receptive mindset is needed. The choice is whether or not to walk a spiritual path.
At its most basic level, the labyrinth is a metaphor for the journey to the center of your deepest self and back out into the world with a broadened understanding of who you are. Labyrinths belong to the family of “Mandalas” (sanskrit for “circle that contain the Essence”). Many people believe that labyrinths guard, activate & amplify the spiritual energies of a place so that people who walk it can experience a feeling of grace, peace or holiness in their heart, soul & spirit.

There is not a "required way" to walk the labyrinth. The beauty of the labyrinth is that people can approach the experience on their own terms. One may enter playfully or purposefully (many people are finding labyrinths therapeutic for children with ADD, who relax by running through the labyrinth); others enjoy taking intentional walks in which they address a specific intention or issue. Many use labyrinths as intercessory walks to offer prayer for others in need, or meditative walks to concentrate on a specific word or passage. Here are some shots from our walk:


 After the labyrinth, we joined Nancy on a nature walk around the property:
Stone circle
Fire pit and chairs for drumming circles


Many thanks to Nancy for welcoming us so warmly!

Board members of the center include: Nancy M. Pfeil, president; Steve Williams, vice president; Sonya Farmer, secretary/treasurer; B.J. Mosher, labyrinth facilitator; Kim Ward, marketing support; April Williams, Lisa Smith, Donna Smith, Adrienne Rule, and Sueanne Hunter. The Kripalu Yoga and Wellness Center is located at 14029 Route 11, Adams Center, N.Y. For more information, visit www.kripaluyogaandwellnesscenter.org.
1 Comment

Nicole Caldwell

Nicole Caldwell is a self-taught environmentalist, green-living savant and sustainability educator with more than a decade of professional writing experience. She is also the co-founder of Better Farm and president of betterArts. Nicole’s work has been featured in Mother Earth News, Reader’s Digest, Time Out New York, and many other publications. Her first book, Better: The Everyday Art of Sustainable Living, is due out this July through New Society Publishers.

On Location: July 4th Fireworks in Alexandria Bay

From the Alexandria Bay Chamber of Commerce Website:
Wednesday, July 4, 2012 @ dusk (approx. 9:45pm)
The evening air was cool, the sky was clear and bright and the crowds came in anticipation for the annual Alexandria Bay Fireworks over Boldt Castle. Many came early for a leisurely stroll through the Village streets, shopping, eating or just enjoying the company of fellow travelers. None were disappointed.

The fireworks display performed by Pyrotechnico were the courtesy of the Alexandria Bay Chamber of Commerce and the many local businesses, individuals and the Town who donated to the cost of the display.

The magnificent display could be seen for miles away lighting up the sky with multi color facets and reflected off the calm waters of the St. Lawrence. In a tribute to our nation's independence, the sky shone bright with the red, white and blue colors of our flag. For the first-timers to the repeat display watchers, the fireworks display over Boldt Castle was truly a magnificent site.

...And a few shots from the night:


All photos and video by Nicole Caldwell
Comment

Nicole Caldwell

Nicole Caldwell is a self-taught environmentalist, green-living savant and sustainability educator with more than a decade of professional writing experience. She is also the co-founder of Better Farm and president of betterArts. Nicole’s work has been featured in Mother Earth News, Reader’s Digest, Time Out New York, and many other publications. Her first book, Better: The Everyday Art of Sustainable Living, is due out this July through New Society Publishers.

On Location: Sing-a-long sendoff

Before arriving at Better Farm, interns- and artist residents-to-be often call and write to us with one question above all others: What's it like there? Sure, they know they're going to work hard, live communally, get their hands dirty, and meet lots of new people. But they often seem most curious about what it's like on a day-to-day basis around here. What do you guys do for fun? What's the atmosphere like?


Brian Purwin, left, and Bob Laisdell.
So on Better Farm's blog, I'm often trying to paint as accurate a picture as possible about the diverse ecosystem that is Better Farm. It's certainly an unusual place, where perfect strangers collide in a big old farmhouse waaaaaay off the beaten path and become like family. Case in point: intern Maylisa Daniels' send-off gathering Sunday night, an event speckled with former artists-in-residence, lodgers, friends from town, and yours truly. The evening started with one of our famous "family dinners" at the big kitchen table (featuring pasta with homemade sauce utilizing the last of our garden tomatoes that had been blanched and frozen back in October), then turned into a good old-fashioned sing-a-long party. Brian Purwin and I traded off on the piano, Brian played a mean fiddle too, and everyone lent their voices.


Knowing this sort of thing is exactly what future visitors to the farm are curious about, I grabbed my camera so that I could share this experience with anyone who's ever wondered what really goes on around this place. Here are the ladies doing a little "Let it Be":


And our MVP of the evening, Maylisa, doing "Summertime":


Warmest wishes to Maylisa as she goes on to make her mark in the world! To learn more about Better Farm and its programming or to schedule a visit, click here.

Artist-in-Residence Brian Purwin Provides 'Bluegrass for Breakfast' at Local Festival

Brian Purwin plays violin. Photo/Erin Fulton
It seems like since arriving at Better Farm a little more than one year ago, Brian Purwin has played violin with everyone.

From the house band on Friday nights at the Dancing Dog to solo practice sessions during a part-time stint at the local wine store; from jam bands in smoky clubs to classical music as brides take the aisle, Brian's become a bit of a celebrity around town. His work has been utilized for full-length album recordings, private violin and piano lessons, and everything in between.

One of Brian's biggest efforts musically in the last year has been to get into the bluegrass circuit. And so, with due diligence and commitment, he has: as a major player in this year's "Bluegrass in the Vineyards" music festival held Aug. 27 and 28 at Coyote Moon Vineyards in Clayton, N.Y.


That festival featured local and national bluegrass artists picking and playing on-site at the winery, a two-day craft fair and market, and all the food and drinks you would ever need.

Brian's Foggy River Band performed Saturday and Sunday:
Foggy River Band is from left: Brian Purwin, Nick Piccininni, Chad Darou, Liza Atkinson, Perry Cleaveland, and Jim Treat. Photo/Erin Fulton
To contact Brian about private violin or piano lessons, to to book a gig, e-mail info@betterarts.org. To learn more about our betterArts residency program, click here.